You need to be a member to see this content. A free membership is sufficient.
It's completely free! You may wonder why membership is required at all. We need it to comply with local laws about nudity-related content, meet Google's advertising guidelines, appeal to potential sponsors, and protect unexpected visitors. The public areas of the site will stay family-friendly. My demonstrations and holistic health tips are designed for mature audiences who understand what to expect. Members get access to free content and exclusive offers. My simple goal is to build a genuine connection with you. Stay naked, happy, and healthy! ♥️😁
Table of Contents
Yijin Jing: A Brief Overview
Yijin Jing is more than just a workout; it’s a holistic practice that integrates physical movement, breath control, and mental focus. While often categorized as Qigong, Yijin Jing emphasizes strengthening muscles and tendons, leading to increased strength, flexibility, speed, stamina, balance, and coordination. Its origins are shrouded in history, with various versions passed down through generations. Some attribute its creation to Bodhidharma, a legendary Buddhist monk, while others suggest it evolved over centuries within Shaolin martial arts traditions. (For a deeper dive into the history and origins, check out the Wikipedia article on Yijin Jing.)
Essential Principles Before You Begin
Before you dive into the 12 Yijin Jing postures, keep these essential principles in mind:
Tongue Position: Keep your tongue gently touching the roof of your mouth, just behind your upper teeth. This connects the Governing and Conception Vessels in TCM, promoting energy flow.
Lean Forward: Except for the first posture, maintain a slight forward lean, engaging your toes as if gripping the ground. This activates specific leg muscles and enhances balance.
Exert Force: Don’t just go through the motions! Engage your muscles fully, as if you’re actually pushing, pulling, or lifting heavy objects. Feel the tension and resistance. Imagine yourself as a powerful warrior 💪, not a floppy noodle 🍝.
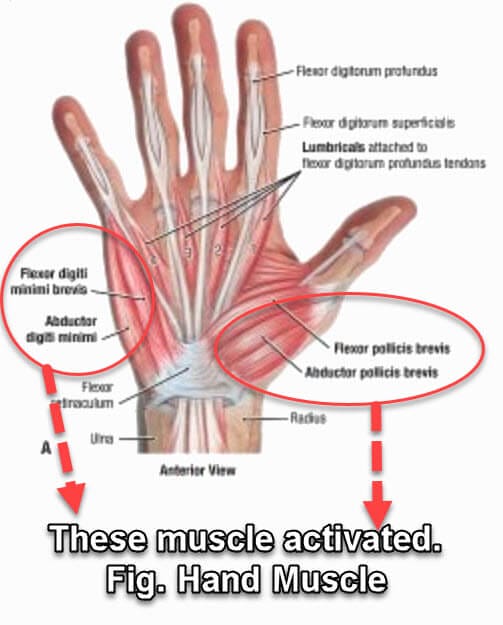
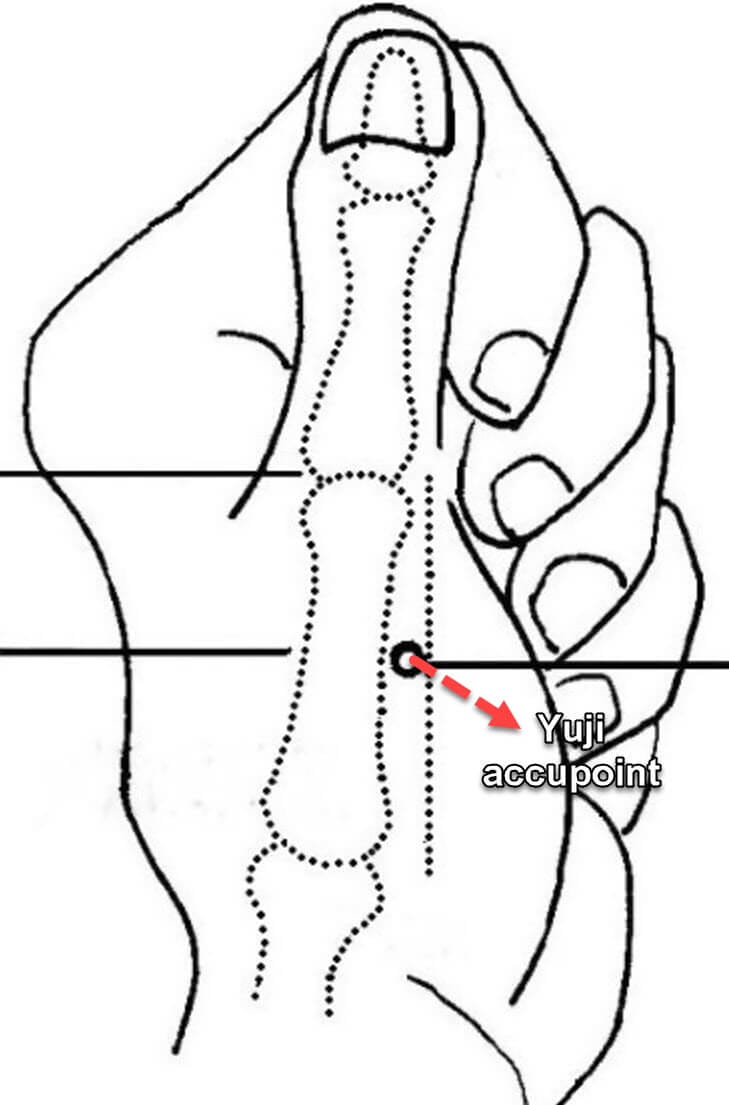
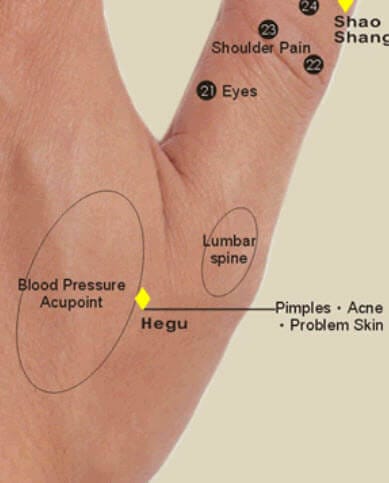
Finger Stretches: Extend your fingers fully, widening the gap between your thumb and pinky. This activates hand muscles and stimulates important acupoints like Hegu and Yuji, which are associated with improved circulation and lung health.

The 12 Yijin Jing Postures: A Step-by-Step Guide
(Note: Visual aids like illustrations or videos would greatly enhance this section. Consider adding them if possible. Since I don’t have access to your original figures, I’m using descriptive text.) Also, please click here to watch the demo video.
Act 1-4: Foundational Strength
Act 4 (Spleen): Raise one arm overhead and push the other down, as if being squeezed between two plates. Switch sides. This activates similar muscles as Act 3, but also engages back muscles like the infraspinatus and teres minor/major. Look upward while keeping your head slightly lowered.
Act 1 (Lungs): Stand straight, chest out, buttocks squeezed, and pelvic floor engaged (like doing Kegels). Gently lift your tailbone and use the “default” hand gesture (fingers extended, palm open). Breathe deeply, visualizing your lungs expanding.
Act 2 (Colon/Rectum): Extend your arms wide and slightly upward, engaging your serratus anterior, external obliques, and back muscles (latissimus dorsi, trapezius, rhomboids). Look slightly down, lift your chest, and keep your mouth and eyes wide open. This posture also stimulates the radial and ulnar arteries in your forearms.
Act 3 (Stomach): Raise both arms straight overhead, fingers facing each other, as if pushing a heavy box. Stand on your toes, leaning slightly forward. This engages the deltoids, brachialis, and abdominal muscles. The toe raise stimulates acupoints related to the stomach, gallbladder, liver, and spleen.
Act 1
You need to be a member to see this content. A free membership is sufficient.
It's completely free! You may wonder why membership is required at all. We need it to comply with local laws about nudity-related content, meet Google's advertising guidelines, appeal to potential sponsors, and protect unexpected visitors. The public areas of the site will stay family-friendly. My demonstrations and holistic health tips are designed for mature audiences who understand what to expect. Members get access to free content and exclusive offers. My simple goal is to build a genuine connection with you. Stay naked, happy, and healthy! ♥️😁
First Posture: Targeting the Lungs
Hand Position: Use the default position described above.
Body Position: Stand straight with your chest lifted (a slightly arched back is acceptable). Engage your glutes and pelvic floor muscles simultaneously, as if performing a Kegel exercise. (Click here to see my post on Kegel exercise) Gently tilt your tailbone upward.
Act 2
You need to be a member to see this content. A free membership is sufficient.
It's completely free! You may wonder why membership is required at all. We need it to comply with local laws about nudity-related content, meet Google's advertising guidelines, appeal to potential sponsors, and protect unexpected visitors. The public areas of the site will stay family-friendly. My demonstrations and holistic health tips are designed for mature audiences who understand what to expect. Members get access to free content and exclusive offers. My simple goal is to build a genuine connection with you. Stay naked, happy, and healthy! ♥️😁
Second Posture: Targeting Colon and Rectum
Hand Gesture: Same as above
Body Gesture:
- Extend your arms outward and slightly upward. This activates (shown in Fig. Torso Muscle) the serratus anterior muscle and external oblique abdominis, which in turn engages the internal oblique abdominis.
- From the back view, the scapulae (shoulder blades) draw together. This engages the latissimus dorsi, trapezius, and rhomboid major and minor muscles, enhancing blood flow to the heart.
- Tilt your head slightly down while lifting your chest. This increases abdominal engagement, activating the transverse abdominal muscle and raising the diaphragm. The extensive muscle engagement may cause slight breathlessness, which helps improve cardiopulmonary function.
- Point your fingers upward to create pressure on the radial and ulnar arteries, promoting blood circulation. This position also engages several arm muscles, including the extensor digitorum, extensor carpi, and extensor retinaculum.
- Open your mouth and eyes wide to expand the airway and exercise facial muscles.
Act 3
You need to be a member to see this content. A free membership is sufficient.
It's completely free! You may wonder why membership is required at all. We need it to comply with local laws about nudity-related content, meet Google's advertising guidelines, appeal to potential sponsors, and protect unexpected visitors. The public areas of the site will stay family-friendly. My demonstrations and holistic health tips are designed for mature audiences who understand what to expect. Members get access to free content and exclusive offers. My simple goal is to build a genuine connection with you. Stay naked, happy, and healthy! ♥️😁
Third Posture: Targeting Stomach
Hand Gesture: Same as above
Body Gesture:
- Raise both arms straight up toward the sky with fingers pointing toward each other. Imagine pushing a heavy box to the maximum height you can reach. The torso contains numerous muscles and acupoints (along major meridians). This upward stretch not only engages the deltoid and brachialis muscles but also stimulates the front torso’s acupoints—particularly the “burong” point. This can help relieve stomach discomfort, including bloating, pain, vomiting, loss of appetite, nausea, chronic gastritis, gastric prolapse, and peptic ulcer.
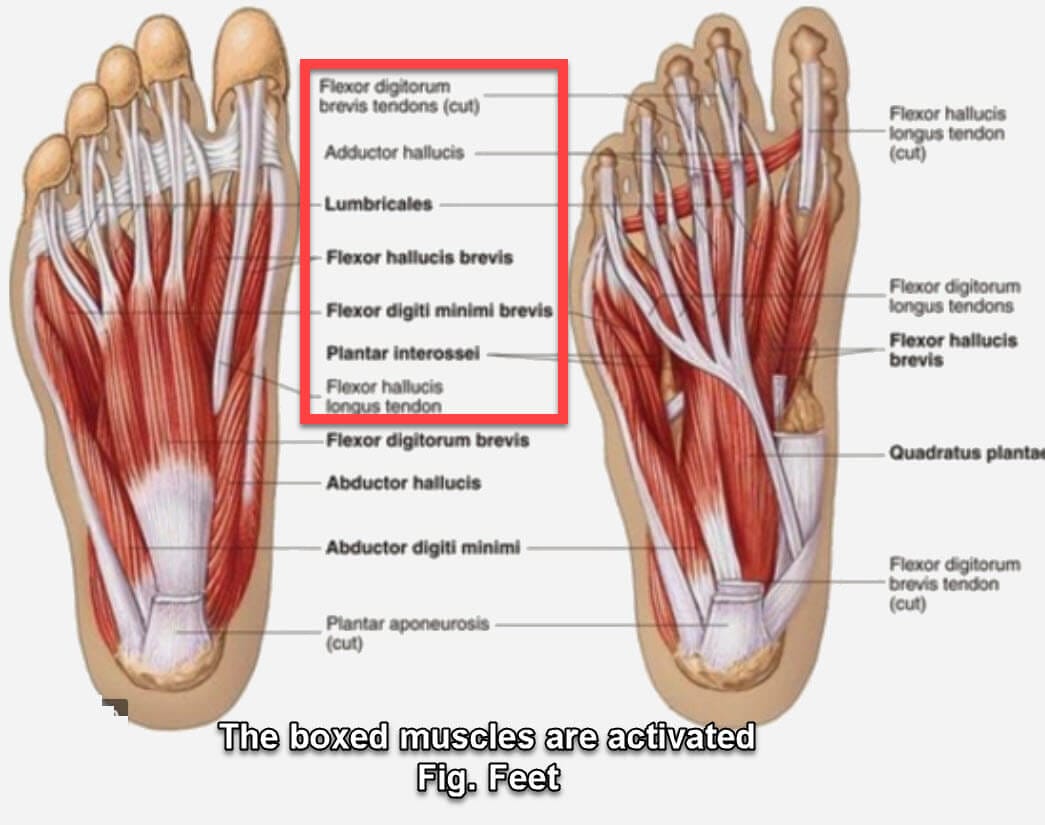
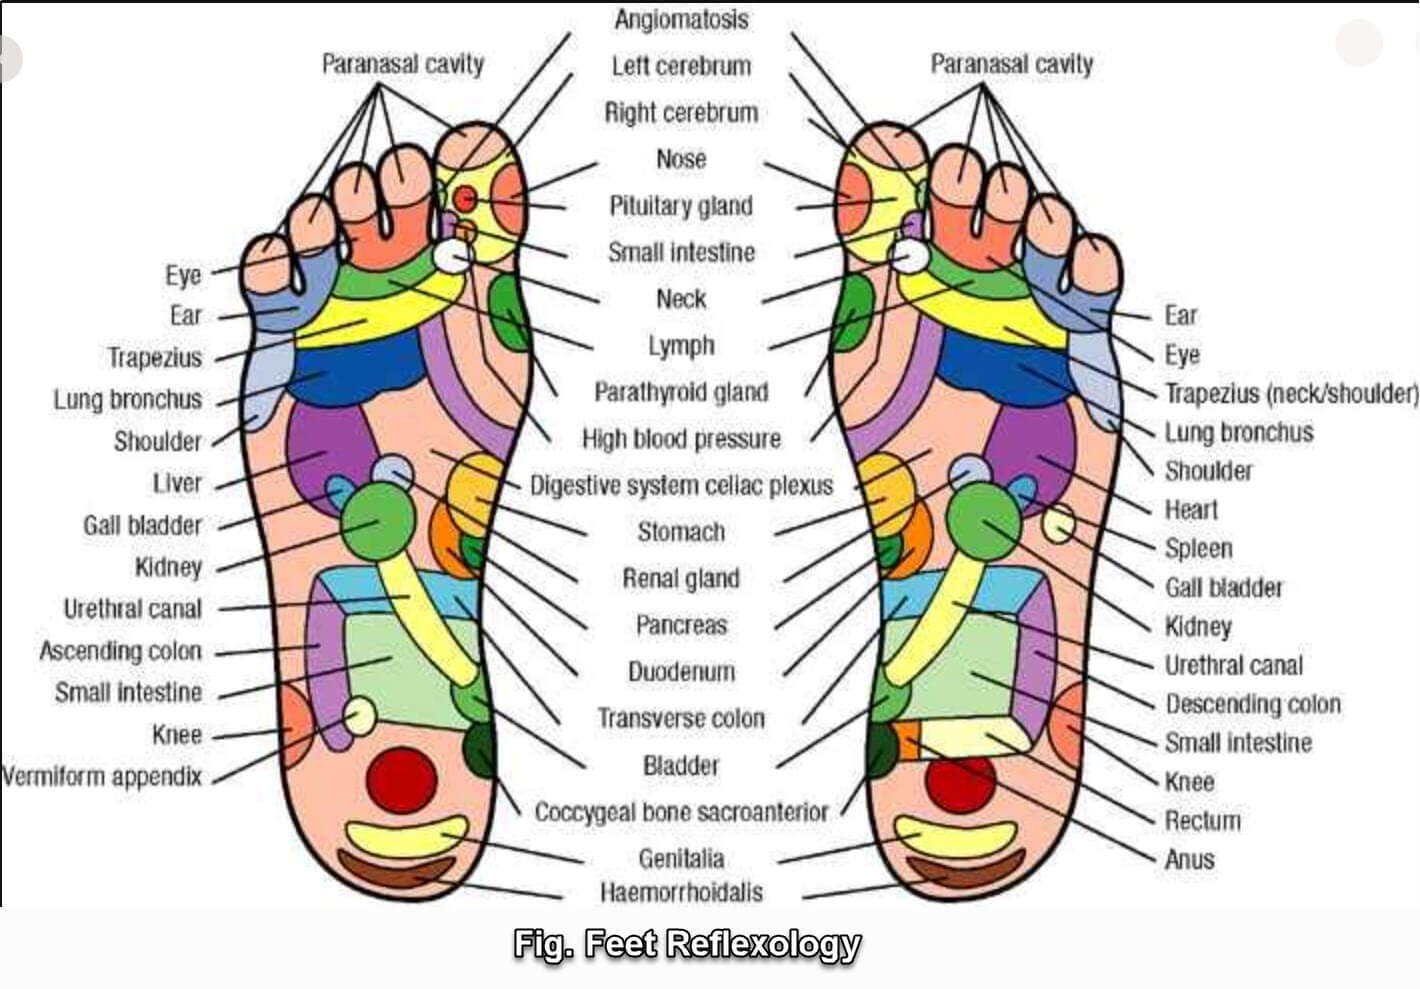
- Stand on your toes while leaning slightly forward. This improves balance while activating ankle muscles and tendons. According to meridian theory and reflexology, the feet influence the entire body—specific areas of the feet correspond to different body parts. In this position, you’ll activate specific acupoints that correspond (in ascending order) to the stomach, gallbladder, liver, and spleen.
- Press your toes downward as if gripping the ground.
Act 4
You need to be a member to see this content. A free membership is sufficient.
It's completely free! You may wonder why membership is required at all. We need it to comply with local laws about nudity-related content, meet Google's advertising guidelines, appeal to potential sponsors, and protect unexpected visitors. The public areas of the site will stay family-friendly. My demonstrations and holistic health tips are designed for mature audiences who understand what to expect. Members get access to free content and exclusive offers. My simple goal is to build a genuine connection with you. Stay naked, happy, and healthy! ♥️😁
Fourth posture: Targeting spleen
Hand gesture: Same as previous posture
Body gesture: Alternate between sides
- Raise one arm straight toward the sky (as in the first posture) while pushing the other arm downward. (Imagine being compressed between two heavy plates that you must push apart with all your strength.)
This position engages the same muscles and acupoints as the third posture, while also activating back muscles including the Infraspinatus, Teres minor and major, and Rhomboid major and minor.
- Direct your gaze upward while keeping your head lowered.
- Press your toes downward as if gripping the ground.
Act 5-8: Core and Balance
Act 8 (Kidneys): Squat with legs wider than shoulder-width, arms straight and fingers pointing outward. Look down as far as possible. This engages leg muscles and improves flexibility.
Act 5 (Heart): Push both arms forward, then pull them back towards your chest repeatedly, as if pushing away and then embracing someone. This activates the biceps, triceps, and acupoints along the Pericardium and Lung Meridians.
Act 6 (Small Intestine): Perform a lunge with your back leg straight, arms extended forward as if running. Rotate your pelvis opposite the front leg. This engages leg muscles and stimulates acupoints like Yingu (Kidney Meridian), Weizhong and Weiyang (Bladder Meridian).
Act 7 (Bladder): Hold your arms out as if holding a towel, stretching your shoulders back. Try to touch your fists together behind your back. Turn your head opposite the raised arm. This intensely activates upper back muscles.
Act 5
You need to be a member to see this content. A free membership is sufficient.
It's completely free! You may wonder why membership is required at all. We need it to comply with local laws about nudity-related content, meet Google's advertising guidelines, appeal to potential sponsors, and protect unexpected visitors. The public areas of the site will stay family-friendly. My demonstrations and holistic health tips are designed for mature audiences who understand what to expect. Members get access to free content and exclusive offers. My simple goal is to build a genuine connection with you. Stay naked, happy, and healthy! ♥️😁
Fifth posture: Targeting heart
Hand gesture: Same as above
Body gesture:
- Push both arms straight out (imagine pushing away someone running toward you). Keep your chest forward and spine straight.
- Pull both hands back to your chest (imagine pulling something heavy toward you against resistance). This movement activates your triceps, biceps, and acupoints in the Pericardium and Lung Meridians—specifically the Chize (“Cubit Marsh”) and Quze (“Marsh at the Crook”) points.
- Repeat these pushing and pulling movements at least 7 times
- Press your toes downward as if gripping the ground
You need to be a member to see this content. A free membership is sufficient.
It's completely free! You may wonder why membership is required at all. We need it to comply with local laws about nudity-related content, meet Google's advertising guidelines, appeal to potential sponsors, and protect unexpected visitors. The public areas of the site will stay family-friendly. My demonstrations and holistic health tips are designed for mature audiences who understand what to expect. Members get access to free content and exclusive offers. My simple goal is to build a genuine connection with you. Stay naked, happy, and healthy! ♥️😁
Sixth posture: Small Intestine Focus
Hand position: Closed fists
Body position:
- Perform a lunge with your back leg completely straight, applying force to maintain the straight position. You should feel tension in both legs. This activates the muscles shown in Fig. Lunge Muscle, with primary engagement of muscles shown in Fig. Lunge Main Muscle. In Meridian theory, the main points of activation (where you may feel soreness) are Yingu (Yin Valley) in the kidney meridian, and Weizhong (Middle of the Crease) and Weiyang (Lateral End of the Crease) in the bladder meridian.
- Position your arms as if running, but focus on spreading them wide with intentional force
- Rotate your pelvis in the opposite direction of your front leg to engage the lower back muscles
- Press your toes firmly into the ground, as if trying to grip it
Act 7
You need to be a member to see this content. A free membership is sufficient.
It's completely free! You may wonder why membership is required at all. We need it to comply with local laws about nudity-related content, meet Google's advertising guidelines, appeal to potential sponsors, and protect unexpected visitors. The public areas of the site will stay family-friendly. My demonstrations and holistic health tips are designed for mature audiences who understand what to expect. Members get access to free content and exclusive offers. My simple goal is to build a genuine connection with you. Stay naked, happy, and healthy! ♥️😁
Seventh Posture: Bladder Focus
Hand Position: Make fists
Body Position:
- Imagine holding a towel with one hand on each end. Stretch your arms to their maximum width, pulling your shoulders back. This powerful movement engages 17 muscles across your upper back, making it incredibly effective.
- For an advanced variation, try bringing your fists together while maintaining the stretched position. This enhances both muscle engagement and flexibility. Turn your head firmly to the opposite side of your raised arms to deepen the stretch.
- Press your toes downward as if gripping the floor for stability.
Act 8
You need to be a member to see this content. A free membership is sufficient.
It's completely free! You may wonder why membership is required at all. We need it to comply with local laws about nudity-related content, meet Google's advertising guidelines, appeal to potential sponsors, and protect unexpected visitors. The public areas of the site will stay family-friendly. My demonstrations and holistic health tips are designed for mature audiences who understand what to expect. Members get access to free content and exclusive offers. My simple goal is to build a genuine connection with you. Stay naked, happy, and healthy! ♥️😁
Eighth Posture: Kidney Focus
Hand Position: Neutral
Body Position: Tilt your head down, moving your eyes downward as if trying to see your mouth. Stand with feet slightly wider than shoulder-width apart, toes pointing forward. Lower into a deep squat position—imagine squatting in nature. If this is challenging, you may place your feet closer together. Extend your arms straight out with fingers pointing outward, pushing away as if pressing against a desk. Press your toes firmly into the ground, as if gripping the surface.
Act 9-12: Flexibility and Flow
- Act 9 (Pericardium): Stand with legs shoulder-width apart. Rotate your torso to the right and left as far as possible, massaging the tendons in your knees.
- Act 10 (Triple Burner): Bend at the waist, placing your fingertips on the ground, and arch your back like a tiger about to pounce. Keep your lower back straight. This engages the groin area and activates Qichong (Stomach Meridian) and Jimen (Spleen Meridian).
- Act 11 (Gallbladder): Place your hands over your ears, fingers on the occipital bone, and bend forward, bringing your head towards your legs.
- Act 12 (Liver): Bend forward with arms and legs straight, fingers pointing forward. Stand on your toes, then lower your heels. Lean forward as far as comfortable.
Act 9
You need to be a member to see this content. A free membership is sufficient.
It's completely free! You may wonder why membership is required at all. We need it to comply with local laws about nudity-related content, meet Google's advertising guidelines, appeal to potential sponsors, and protect unexpected visitors. The public areas of the site will stay family-friendly. My demonstrations and holistic health tips are designed for mature audiences who understand what to expect. Members get access to free content and exclusive offers. My simple goal is to build a genuine connection with you. Stay naked, happy, and healthy! ♥️😁
Ninth Posture: Targeting Heart (Pericardium meridian, not heart meridian)
Hand Position: Standard position (relax if fatigued)
Body Position: Stand with feet shoulder-width apart. Rotate your torso to either right or left as far as comfortable. This movement massages the knee tendons. You should feel a gentle tension in your lower back, waist, and knees. Press your toes downward as if gripping the ground.
Act 10
You need to be a member to see this content. A free membership is sufficient.
It's completely free! You may wonder why membership is required at all. We need it to comply with local laws about nudity-related content, meet Google's advertising guidelines, appeal to potential sponsors, and protect unexpected visitors. The public areas of the site will stay family-friendly. My demonstrations and holistic health tips are designed for mature audiences who understand what to expect. Members get access to free content and exclusive offers. My simple goal is to build a genuine connection with you. Stay naked, happy, and healthy! ♥️😁
Tenth posture: Triple Burner Meridian
Hand position: Curl your fingers at their first joints and press these joints firmly into the floor, gripping with intensity.
Body position: Adopt a tiger’s predatory stance. Arch your back like a cat preparing to pounce, while maintaining a flat lower back—imagine being able to balance a coffee cup there. This posture should create a noticeable stretch in your groin area. The position primarily stimulates two key points: Qichong (Qi Surge) in the stomach meridian and Jimen (Separation Gate) in the spleen meridian.
Act 11
You need to be a member to see this content. A free membership is sufficient.
It's completely free! You may wonder why membership is required at all. We need it to comply with local laws about nudity-related content, meet Google's advertising guidelines, appeal to potential sponsors, and protect unexpected visitors. The public areas of the site will stay family-friendly. My demonstrations and holistic health tips are designed for mature audiences who understand what to expect. Members get access to free content and exclusive offers. My simple goal is to build a genuine connection with you. Stay naked, happy, and healthy! ♥️😁
Posture: Targeting Gallbladder
Hand Gesture and Body Position:
Place your hands on your ears with your fingers resting on your occipital bone (the back of your head). Bend your torso forward, attempting to bring your head between your legs. Keep your teeth gently clenched.
Act 12
You need to be a member to see this content. A free membership is sufficient.
It's completely free! You may wonder why membership is required at all. We need it to comply with local laws about nudity-related content, meet Google's advertising guidelines, appeal to potential sponsors, and protect unexpected visitors. The public areas of the site will stay family-friendly. My demonstrations and holistic health tips are designed for mature audiences who understand what to expect. Members get access to free content and exclusive offers. My simple goal is to build a genuine connection with you. Stay naked, happy, and healthy! ♥️😁
Posture: Liver Focus
Hand Position: Standard position
Body Position: Bend forward with straight arms and legs, fingers reaching toward the ground. Rise onto your toes, then carefully lower back down. Important: Maximize your forward bend before lowering to prevent head strain.
Understanding the Meridian System and Acupoints
In Traditional Chinese Medicine (TCM), Qi flows through the body along pathways called meridians. Acupoints are specific locations along these meridians that can be stimulated to influence Qi flow and address health imbalances. The 12 Yijin Jing postures are designed to activate specific acupoints, promoting the smooth flow of Qi and enhancing organ function. (For a comprehensive list of acupoints and meridians, see [this resource](add link to acupoint list).) The hand gestures in Yijin Jing often stimulate acupoints like Hegu (Large Intestine 4) and Yuji (Lung 10), known for their roles in boosting immunity and relieving respiratory issues.
The Importance of Footwork in Yijin Jing
The emphasis on gripping the ground with your toes in most Yijin Jing postures is not arbitrary. It activates muscles in the feet and lower legs, stimulating acupoints and reflexology zones. According to TCM theory and reflexology, the feet are a microcosm of the entire body, and stimulating specific areas on the feet can influence corresponding organs and systems.
Variations and Adaptations of Yijin Jing
As with many ancient practices, numerous variations of Yijin Jing exist. Some versions incorporate dynamic movements and flowing transitions between postures, while others emphasize static holds. The version described here is based on a televised demonstration by a Qigong master and medical doctor specializing in acupuncture and TCM. Experiment with different versions to find what resonates best with your body and practice goals.
My Conclusive Thoughts on Yijin Jing
The 12 Yijin Jing postures offer a powerful yet accessible way to cultivate Qi, enhance physical function, and deepen your mind-body connection. While the postures can be physically demanding, remember to listen to your body and modify them as needed. Consistency is key – even a few minutes of practice each day can yield significant benefits over time. So, embrace the challenge, unleash your inner Qi, and enjoy the transformative journey of Yijin Jing!
Recommended Reading on Martial Arts and Body Mechanics
- The Anatomy of Martial Arts: A basic guide illustrating the muscles used in various martial arts techniques. Helpful for beginners understanding body mechanics and injury prevention.
- Zen in the Martial Arts: Explores the philosophical and mental aspects of martial arts training, emphasizing mindfulness and self-discipline.
References and Further Exploration
I was trying to find some nice book/pamphlets on Yijinjing, but most good ones (well-organized and detailed on how to practice, what to expect and cautions) are in Chinese or Japanese. So instead of focusing on this particular form/style, I reoriented my search on general martial arts, their histories, physiological, physical and medical perspectives.
- The Anatomy of Martial Arts: An Illustrated Guide to the Muscles Used for Each Strike, Kick, and Throw While this book provides a solid foundation, it’s primarily suited for beginners in martial arts. It helps newcomers understand proper movement execution, though it doesn’t provide complete move instructions. The book effectively explains the potential physical impacts of intensive martial arts training, making it valuable when discussing injuries with physical therapists. Its section on strengthening exercises for specific moves is helpful for building strength and flexibility, though a comprehensive training program for different skill levels would be more beneficial. It’s worth noting that different martial art styles emphasize varying body mechanics and philosophical approaches.
It details takedowns, strikes and defenses in martial arts from Kendo and Karate to Jiujitsu and Judo with this illustrated guide to the muscles and anatomy behind each movement.With detailed anatomical drawings, this book precisely illustrates the inner workings of your body during key martial arts moves. Its color drawings, helpful photos and clear text make it easy to identify the specific muscles you need to train for maximum speed, power and accuracy. More than just an anatomy book, each section is accompanied by exercises and stretches to strengthen muscles, prevent injury and improve form.
- Zen in the Martial ArtsThis insightful book explores the multifaceted nature of martial arts beyond mere physical training. It demonstrates how Zen principles can enhance both physical expertise and mental discipline, helping practitioners manage personal challenges like self-image, work stress, and competition. The author shows how mastering martial arts’ spiritual aspects can transform your life, improving relationships and unlocking your full potential. Through fascinating glimpses into training sessions with legends like Bruce Lee and Ed Parker, it offers timeless wisdom—though an updated edition covering contemporary martial artists’ perspectives would be welcome.
Thanks for reading, everyone! I hope this was helpful, even if just a little bit. Let me know your thoughts in the comments, and please share if you found it valuable!
- [Evidence Based Acupuncture Training: Acupuncture in Physiotherapy]
- Overview, history and other reference info about acupuncture
- [On Acupoint Hegu]
- [List of all acupoints]
- [Science on reflexology: American reflexology association]
Nakedwill | Nudity Rocks 👚🚫
Everybody is Beautiful.
If you could, please consider supporting Nakedwill through any of the platforms below. All Platforms are the same. I just want to give y’all the maximal convenience. Choose the one you’re the most familiar with or the one you are supporting other creators on or yourself is on (Remember to send me the links 😊)